Homemade Blueberry Vanilla Jam – Easy 30-Minute Recipe
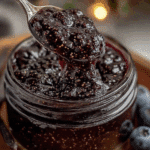
This quick and easy homemade blueberry vanilla jam comes together in just 30 minutes with simple ingredients. Perfectly thick, fruity, and infused with real vanilla bean, it’s a versatile spread for toast, yogurt, cheese boards, and more.
- Prep Time: 5 minutes
- Cook Time: 25 minutes
- Total Time: 30 minutes
- Yield: 2 cups (16 servings of 2 tablespoons each) 1x
- Category: Condiment
- Cuisine: American
Ingredients
- 3 cups fresh or frozen blueberries (about 450g)
- 1 cup granulated sugar (200g)
- 1 vanilla bean
- 2 tablespoons fresh lemon juice (about half a lemon)
- Pinch of salt
Instructions
- Prep your vanilla bean. Place the vanilla bean on a cutting board. Use your small knife to split it lengthwise down the middle, keeping one end intact so it stays together. Run the back of the knife along the inside to scrape out those tiny black seeds. Don’t throw away the pod—it still has flavor to give.
- Start the berries. Add the blueberries to your heavy pot. Turn the heat to medium and let them warm up for about 2 minutes, stirring occasionally. You’ll hear them start to pop and release their juices.
- Add the sugar and lemon juice. Pour in the sugar and lemon juice. Add that pinch of salt. Drop in the vanilla seeds and the empty pod too. Stir everything together until the sugar starts to dissolve, about 1 minute.
- Bring to a boil. Turn the heat up to medium-high and bring the mixture to a full, rolling boil. You want bubbles that don’t stop when you stir. This usually takes about 5-7 minutes. Don’t walk away—boiling jam can bubble over fast.
- Mash and stir. Once it’s boiling, use your potato masher or fork to break down the berries. I like to leave about a third of them whole for texture. Stir frequently with your wooden spoon, scraping the bottom to prevent sticking.
- Simmer until thick. Reduce the heat to medium and let it simmer for 15-20 minutes, stirring every couple of minutes. You’ll notice the jam starting to darken and get glossy. The bubbles will get bigger and slower as it thickens.
- Test for doneness. Take that cold plate out of the freezer. Drop a small spoonful of jam onto it and let it sit for 30 seconds. Push your finger through it—if it wrinkles and holds its shape, it’s ready. If it’s still runny, cook another 2-3 minutes and test again.
- Remove the vanilla pod. Fish out the empty vanilla pod with tongs. Don’t throw it away! Rinse it off and let it dry—you can bury it in a jar of sugar to make vanilla sugar later.
- Let it rest. Remove the pot from heat and let the jam sit for 5 minutes. This helps it settle and thicken a bit more before you jar it.
- Jar it up. Carefully ladle the hot jam into your clean jars, leaving about ¼ inch of space at the top. Wipe the rims clean with a damp paper towel, then screw on the lids. Let the jars cool completely on the counter before refrigerating.
Notes
Use a heavy pot to prevent scorching. Don’t skip the lemon juice—it helps the jam set. Stir frequently, especially in the last 10 minutes. The frozen plate test is more reliable than a thermometer. If doubling the recipe, use a wider pot and expect cooking time to increase by 5-10 minutes. For a low-sugar version, reduce sugar to ½ cup and add 1 tablespoon low-sugar pectin powder. For shelf stability, process jars in a boiling water bath for 10 minutes.
Nutrition
- Serving Size: 2 tablespoons
- Calories: 45
- Sugar: 10
- Sodium: 1
- Carbohydrates: 11
- Fiber: 1
Keywords: blueberry jam, vanilla jam, homemade jam, easy jam recipe, 30-minute jam, blueberry vanilla jam, small batch jam, no pectin jam