Love this? Save it for later!
Share the inspiration with your friends
The text came in just as I was staring into the open fridge, feeling that familiar pre-party panic. “Bring something easy to snack on!” my friend had written. Easy. Right. I had about twenty minutes before I needed to walk out the door, and the last thing I wanted was to show up with a bag of chips. I grabbed a wooden board, started pulling things from the fridge and pantry—jarred peppers, a hunk of salami, some cheese that was definitely past its prime but still fine—and just started arranging. No recipe. No plan. Just a desperate hope it would look intentional.
It looked amazing. Honestly, it looked like I had spent hours on it. People gathered around that board before they even took their coats off. They stood there, picking at olives and tearing off pieces of bread, and I stood there pretending I had planned the whole thing. That night, I learned the most valuable party trick I know: you don’t need to cook to impress. You just need a good antipasto platter.
This Easy Antipasto Platter has become my secret weapon for effortless entertaining. It’s the appetizer that requires no oven, no stove, and no stress. It’s built on simple, high-quality ingredients that do all the work for you. Whether you’re hosting a last-minute get-together or planning a holiday spread, this platter is the move that always works. And honestly? It’s the only recipe I never get tired of making.
Why You’ll Love This Recipe
I’ve tested a lot of party food over the years—some that required babysitting a hot oven, others that turned into a sad, soggy mess. This antipasto platter is the opposite of all that. It’s the kind of appetizer that makes you look like a host who has their life together, even when you’re running on fumes and coffee.
- Ready in 15 Minutes: No cooking, no waiting. Just arrange and serve. Perfect for those “they’ll be here in 20 minutes” moments.
- No Special Equipment: You don’t need a fancy board or special tools. A large plate, a cutting board, or even a baking sheet works beautifully.
- Endlessly Customizable: Use what you have, swap what you don’t. This platter adapts to your fridge, your budget, and your cravings.
- Always a Crowd-Pleaser: Salty, tangy, creamy, crunchy—this board hits every note. I’ve watched people who “don’t like olives” eat three. It’s that good.
- Perfect for Any Occasion: Game day, holiday parties, casual dinners, or a quiet night in with a glass of wine. It fits everywhere.
What makes this platter different from a random pile of snacks? It’s the balance. The salty bite of cured meats against the creamy richness of fresh mozzarella. The briny pop of olives next to the sweet tang of roasted peppers. It’s not just ingredients on a board—it’s a carefully composed experience that tastes like you put way more effort into it than you actually did. And that, my friend, is the secret to stress-free entertaining.
What Ingredients You Will Need
This recipe is built on simple, grocery-store-friendly ingredients. You don’t need to hunt down specialty items or spend a fortune. Here’s what I typically use, along with a few notes from my own kitchen trials.
For the Meats
- Prosciutto (4-6 slices): Look for thinly sliced prosciutto di Parma if you can. It’s delicate, salty, and melts on the tongue. If prosciutto isn’t your thing, swap in soppressata or genoa salami for a bolder flavor.
- Genoa Salami (4-6 slices): I love the peppery bite of genoa salami. It holds up well on the board and pairs beautifully with cheese. I usually buy a pre-sliced pack from the deli counter to save time.
- Capicola (4-6 slices): This is my secret weapon. Capicola is spiced, slightly sweet, and incredibly tender. It adds a layer of flavor that makes people ask, “What is this? It’s amazing.”
For the Cheeses
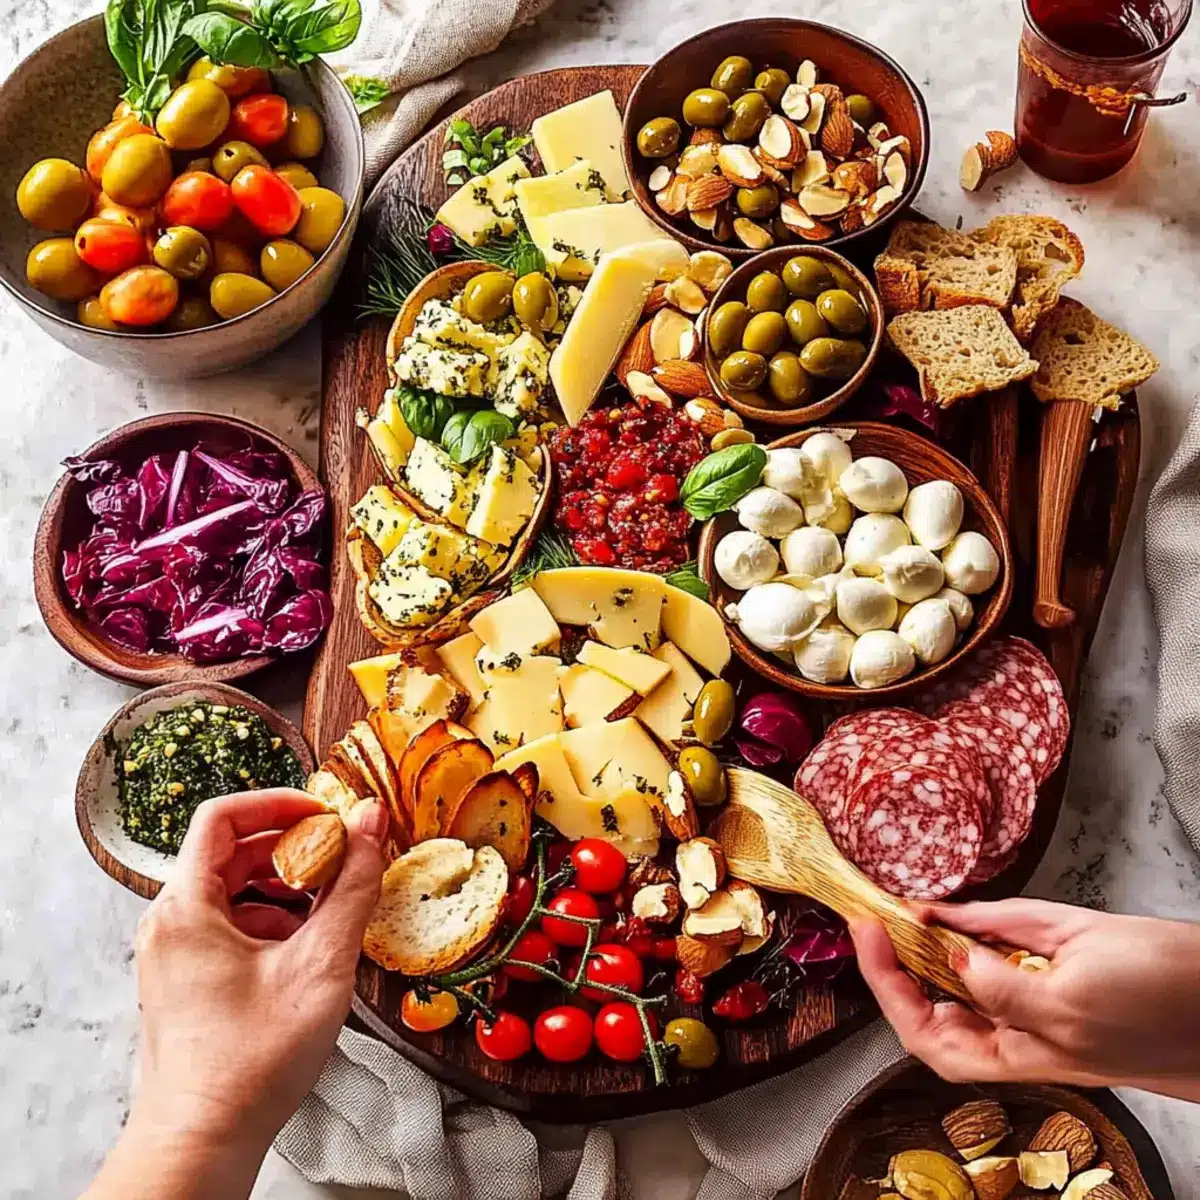
- Fresh Mozzarella (8 oz): Go for the small bocconcini or ciliegine (cherry-sized balls). They’re perfectly bite-sized and creamy. Pat them dry with a paper towel before adding to the board so they don’t make everything watery.
- Aged Provolone (4 oz): Sharp, slightly tangy, and firm enough to slice easily. I like to cut it into thin wedges or small cubes. It’s a great contrast to the soft mozzarella.
- Parmesan or Pecorino (a few shards): A small bowl of shaved parmesan or a wedge of pecorino adds a salty, nutty punch. Use a vegetable peeler to make thin, pretty shards.
For the Vegetables & Pickles
- Roasted Red Peppers (1 cup): Jarred is totally fine—just drain and pat them dry. Their sweetness cuts through the saltiness of the meats. I love the ones packed in oil for extra flavor.
- Marinated Artichoke Hearts (1 cup): These are little flavor bombs. Tangy, tender, and slightly briny. Drain them well and halve any large pieces.
- Kalamata Olives (½ cup): Their rich, fruity flavor is non-negotiable for me. If you’re not an olive fan, try castelvetrano olives—they’re milder and buttery.
- Pepperoncini (½ cup): For a little heat and brightness. These are mild enough for most people but add a lovely tangy kick.
For the Crunch & Extras
- Good Quality Crackers or Crostini (about 20): I love Rustic Bakery flatbread crackers or simple toasted baguette slices. Look for something sturdy enough to hold toppings without breaking.
- Honey (for drizzling): A small bowl of honey adds a sweet finish that pairs beautifully with the salty cheese and meats. It’s optional but highly recommended.
- Fresh Herbs (for garnish): A few sprigs of rosemary or thyme add color and a subtle aromatic note. Totally optional, but it makes the board look like a magazine cover.
Equipment Needed
You don’t need much for this platter, which is part of its charm. Here’s what I use:
- Large Wooden Board or Serving Platter: A wooden board is classic, but a large white platter, a baking sheet, or even a clean cutting board works perfectly. The key is surface area—you want room to spread everything out.
- Small Bowls (2-3): Use these for olives, honey, or anything that might leak liquid. I love using small ceramic ramekins or little glass bowls.
- Cheese Knives or Small Spreaders: Provide a small knife for each cheese to keep things tidy.
- Paper Towels: Pat dry any jarred ingredients to prevent sogginess. Trust me on this one.
- Vegetable Peeler: For making those pretty parmesan shards. It’s a small touch that makes a big visual difference.
Preparation Method
This is where the magic happens. The method is simple, but the order matters for the best visual impact. Here’s my step-by-step process.
- Prep Your Ingredients (5 minutes): Take the cheeses out of the fridge about 10 minutes before you start so they come to room temperature. This makes them creamier and more flavorful. Drain the artichokes and peppers, and pat them dry with a paper towel. Slice the provolone into thin wedges or small cubes. If using a block of parmesan, use a vegetable peeler to create thin shards.
- Arrange the Bowls First (2 minutes): Place your small bowls on the board. I usually put one for olives, one for honey, and one for the pepperoncini. Spacing them out helps create visual anchors. This step is crucial because once you start adding larger items, it’s harder to fit the bowls in.
- Add the Cheeses (3 minutes): Place the cheeses in different areas of the board, not all clustered together. Put the fresh mozzarella in one corner, the provolone wedges in another, and the parmesan shards near the center. This encourages people to move around the board and try different combinations.
- Layer the Meats (3 minutes): Fold or drape the sliced meats in loose piles. Don’t lay them flat—folded pieces look more abundant and are easier to grab. I usually create three separate piles: one for prosciutto, one for salami, and one for capicola. Place them near the cheeses they pair best with (prosciutto near mozzarella, salami near provolone).
- Fill in with Vegetables (3 minutes): Add the roasted peppers, artichoke hearts, and any other vegetables in the gaps between the meats and cheeses. Try to distribute the colors evenly—red peppers here, green artichokes there. This is where the board starts to look full and beautiful.
- Add the Crunch (2 minutes): Arrange the crackers or crostini in small clusters around the board. Don’t line them all up in a row—scatter them in groups of 3-4. This creates texture and makes it easy for guests to grab a few at a time.
- Finish with Garnishes (2 minutes): Drizzle a little honey over the provolone or mozzarella if you’re using it. Add a few sprigs of fresh rosemary or thyme for color. Step back and look at your board—fill in any empty spots with extra olives or a handful of crackers. Serve immediately, or cover with plastic wrap and refrigerate for up to 2 hours. If refrigerating, let it sit at room temperature for 15 minutes before serving.
Cooking Tips & Techniques
Here are the little things I’ve learned from making this platter more times than I can count. These tips will save you from common mistakes and make your board look like a pro did it.
- Room Temperature is Your Friend: Cheese and cured meats are at their best when they’re not straight out of the fridge. Give them at least 10-15 minutes at room temperature before serving. The flavors open up, and the texture becomes so much more enjoyable.
- Don’t Overcrowd the Board: I know it’s tempting to pile everything on, but a crowded board looks messy and makes it hard for guests to grab what they want. Leave a little breathing room between items. If you have too much, use a second board or plate.
- Balance the Flavors: Think about pairing salty meats with creamy cheeses, tangy pickles with sweet peppers. A good antipasto platter has a little bit of everything, and every bite should feel different from the last.
- Use Color as Your Guide: A visually stunning board is one that has a rainbow of colors. Red peppers, green olives, white mozzarella, yellow provolone, dark salami. Arrange with color in mind, and the board will practically arrange itself.
- Prep Ahead for Stress-Free Hosting: You can slice the cheeses, drain the vegetables, and even arrange everything on the board (without the crackers) up to 4 hours ahead. Cover tightly with plastic wrap and refrigerate. Add the crackers and garnishes just before serving.
Variations & Adaptations
One of the best things about this platter is how flexible it is. Here are some of my favorite variations, depending on the occasion or what’s in my fridge.
- Vegetarian Version: Skip the meats and double up on the cheeses and vegetables. Add marinated mushrooms, grilled zucchini strips, or roasted eggplant. A handful of toasted nuts (like almonds or walnuts) adds great crunch.
- Gluten-Free Option: Swap the crackers for gluten-free crackers or use sliced cucumber, bell pepper strips, or rice cakes as the base. Everything else is naturally gluten-free.
- Spicy Twist: Add a small bowl of soppressata (spicy salami), pickled jalapeños, or a drizzle of chili honey. It gives the platter a fiery kick that’s perfect for game day or a party with bold flavors.
- Seasonal Variation: In summer, add fresh figs, sliced peaches, or cherry tomatoes. In fall, try roasted butternut squash cubes, dried cranberries, and a sprinkle of pomegranate seeds. The platter can change with the seasons beautifully.
- Dairy-Free Adaptation: Use vegan cheese alternatives or skip the cheese entirely and focus on marinated vegetables, olives, nuts, and a good quality hummus. It’s still a stunning and satisfying board.
Serving & Storage Suggestions
This platter is best served immediately, but there are a few tricks to keep it fresh if you’re making it ahead or dealing with leftovers.
- Serving Temperature: Serve the platter at room temperature. If you’ve refrigerated it, let it sit out for 15-20 minutes before guests arrive. Cold cheese and meat lose their flavor and texture.
- Presentation Tips: Place the board in the center of the table where everyone can reach it. Provide small plates and napkins. If you’re serving a crowd, consider making two smaller boards instead of one giant one—it encourages more mingling.
- Storage: Leftover meats and cheeses can be stored separately in airtight containers in the refrigerator for up to 3 days. The crackers will get soft if stored with the other ingredients, so keep them in a separate bag or container.
- Reheating: This platter is served cold or at room temperature, so no reheating is needed. If you want to refresh the bread or crackers, pop them in a 350°F oven for 3-5 minutes to crisp them up again.
- Flavor Development: Interestingly, the flavors of the marinated vegetables and cheeses actually meld together a bit if the platter sits for an hour or so. It’s not better or worse—just different. If you have leftovers, the pickled flavors can intensify overnight, so keep that in mind.
Nutritional Information & Benefits
While this platter is more about indulgence than health food, it does have some surprising benefits. Here’s a rough estimate for a serving (about ¼ of the platter).
- Calories: Approximately 350-450 per serving (depending on cheese and meat choices)
- Protein: 15-20g (thanks to the meats and cheeses)
- Healthy Fats: The olive oil in the marinated vegetables and the cheeses provide monounsaturated fats, which are heart-healthy.
- Vitamins: Roasted red peppers are packed with vitamin C, and olives contain vitamin E and antioxidants.
- Dietary Considerations: This platter is naturally low-carb and keto-friendly. It can be made gluten-free with simple swaps. It contains dairy, so it’s not suitable for vegans or those with dairy allergies.
I love that this platter feels indulgent but doesn’t leave me feeling heavy. It’s the kind of appetizer that satisfies without weighing you down, which is exactly what I want before a big meal.
Conclusion
This Easy Antipasto Platter has saved me more times than I can count. It’s the appetizer that never fails, the one that makes people linger around the table, and the one that lets me actually enjoy my own party instead of being stuck in the kitchen. It’s proof that you don’t need a complicated recipe or hours of prep to be a great host. You just need good ingredients, a little creativity, and the confidence to put it all on a board.
I’d love to hear how you make this platter your own. Do you add a special ingredient? Have a favorite cheese combo? Drop a comment below and share your version. And if you’re looking for another effortless appetizer that’s always a hit, don’t miss my creamy dill pickle dip—it’s the perfect companion to this board. Happy entertaining, friends!
Frequently Asked Questions
Can I make an antipasto platter ahead of time?
Yes! You can prep all the ingredients and arrange them on the board (without the crackers) up to 4 hours ahead. Cover tightly with plastic wrap and refrigerate. Add the crackers and any fresh garnishes just before serving.
What if I don’t have a wooden board?
No problem at all. A large white platter, a baking sheet, a cutting board, or even a clean pizza pan works beautifully. The key is having enough surface area to spread everything out.
How do I keep the crackers from getting soft?
Store crackers separately until just before serving. If you’re making the board ahead, add the crackers at the last minute. This keeps them perfectly crunchy.
Can I use pre-sliced cheese from the grocery store?
Absolutely. Pre-sliced provolone, pre-shredded parmesan, and even pre-sliced mozzarella are totally fine. Just make sure to pat any wet ingredients dry so they don’t make the board soggy.
What’s the best way to arrange the ingredients for visual appeal?
Start with the bowls (for olives, honey, etc.), then add the cheeses in different areas, followed by the meats in folded piles. Fill in gaps with vegetables and crackers. Use color as your guide—spread out reds, greens, and whites for a balanced look.
Easy Antipasto Platter: Best Party Appetizer in 15 Minutes
This Easy Antipasto Platter is the ultimate no-cook party appetizer, ready in just 15 minutes. With cured meats, cheeses, marinated vegetables, and crunchy crackers, it’s a crowd-pleasing board that looks impressive with minimal effort.
- Prep Time: 15 minutes
- Cook Time: 0 minutes
- Total Time: 15 minutes
- Yield: 4 servings 1x
- Category: Appetizer
- Cuisine: Italian
Ingredients
- 4–6 slices prosciutto
- 4–6 slices genoa salami
- 4–6 slices capicola
- 8 oz fresh mozzarella (bocconcini or ciliegine)
- 4 oz aged provolone
- Parmesan or pecorino shards (a few)
- 1 cup roasted red peppers (jarred, drained)
- 1 cup marinated artichoke hearts (drained)
- ½ cup Kalamata olives
- ½ cup pepperoncini
- 20 good quality crackers or crostini
- Honey (for drizzling, optional)
- Fresh herbs (rosemary or thyme, for garnish, optional)
Instructions
- Prep your ingredients: Take cheeses out of fridge 10 minutes before starting. Drain artichokes and peppers, pat dry. Slice provolone into thin wedges or cubes. Use a vegetable peeler to make parmesan shards.
- Arrange small bowls on the board for olives, honey, and pepperoncini. Space them out to create visual anchors.
- Place cheeses in different areas of the board: fresh mozzarella in one corner, provolone wedges in another, parmesan shards near the center.
- Fold or drape sliced meats in loose piles: one for prosciutto, one for salami, one for capicola. Place near complementary cheeses.
- Fill gaps with roasted peppers, artichoke hearts, and other vegetables, distributing colors evenly.
- Arrange crackers or crostini in small clusters around the board (groups of 3-4).
- Drizzle honey over provolone or mozzarella if using. Garnish with fresh herbs. Serve immediately, or cover and refrigerate up to 2 hours. If refrigerated, let sit at room temperature 15 minutes before serving.
Notes
For best flavor, let cheeses and meats come to room temperature before serving. Pat all jarred ingredients dry to prevent sogginess. Store crackers separately until serving to keep them crunchy. The platter can be assembled (without crackers) up to 4 hours ahead.
Nutrition
- Serving Size: 1/4 of platter
- Calories: 350450
- Sugar: 58
- Sodium: 8001200
- Fat: 2030
- Saturated Fat: 812
- Carbohydrates: 1520
- Fiber: 35
- Protein: 1520
Keywords: antipasto platter, easy appetizer, party appetizer, no-cook appetizer, Italian appetizer, charcuterie board, 15-minute recipe



